
Twenty-four hours.
That's the window between a fast dry-out and a reconstruction project.
Water damage compounds fast – clean water turns gray, drywall swells, mold spores germinate, and the bill climbs by the hour.
Most of that window gets lost figuring out what to do next, in what order, and who to call first. Here are the 8 steps to take after water damage.
Key Notes
Even clean water turns gray within 24–48 hours (forcing material removal that fast drying could have avoided).
Mold spores germinate in 24–48 hours after a single leak – speed of drying matters more than leak frequency.
Sewage, storm flooding, and any standing water deeper than a few inches require licensed remediation, not DIY cleanup.
Step 1: Make The Area Safe Before You Touch Anything
The first five minutes after discovering water damage are about people, not property.
Stop at the doorway and scan the scene before you walk in.
Electricity Rules To Follow Exactly:
Shut off power at the breaker panel if water is touching outlets, cords, or appliances (but only if you can reach the panel through a completely dry path).
Do not touch the panel if it's in or beyond a wet area, if the room is heavily flooded, or if you smell smoke. Call your utility company or an emergency electrician to disconnect power from outside.
Keep children, pets, and tenants out of the affected zone until power is confirmed off.
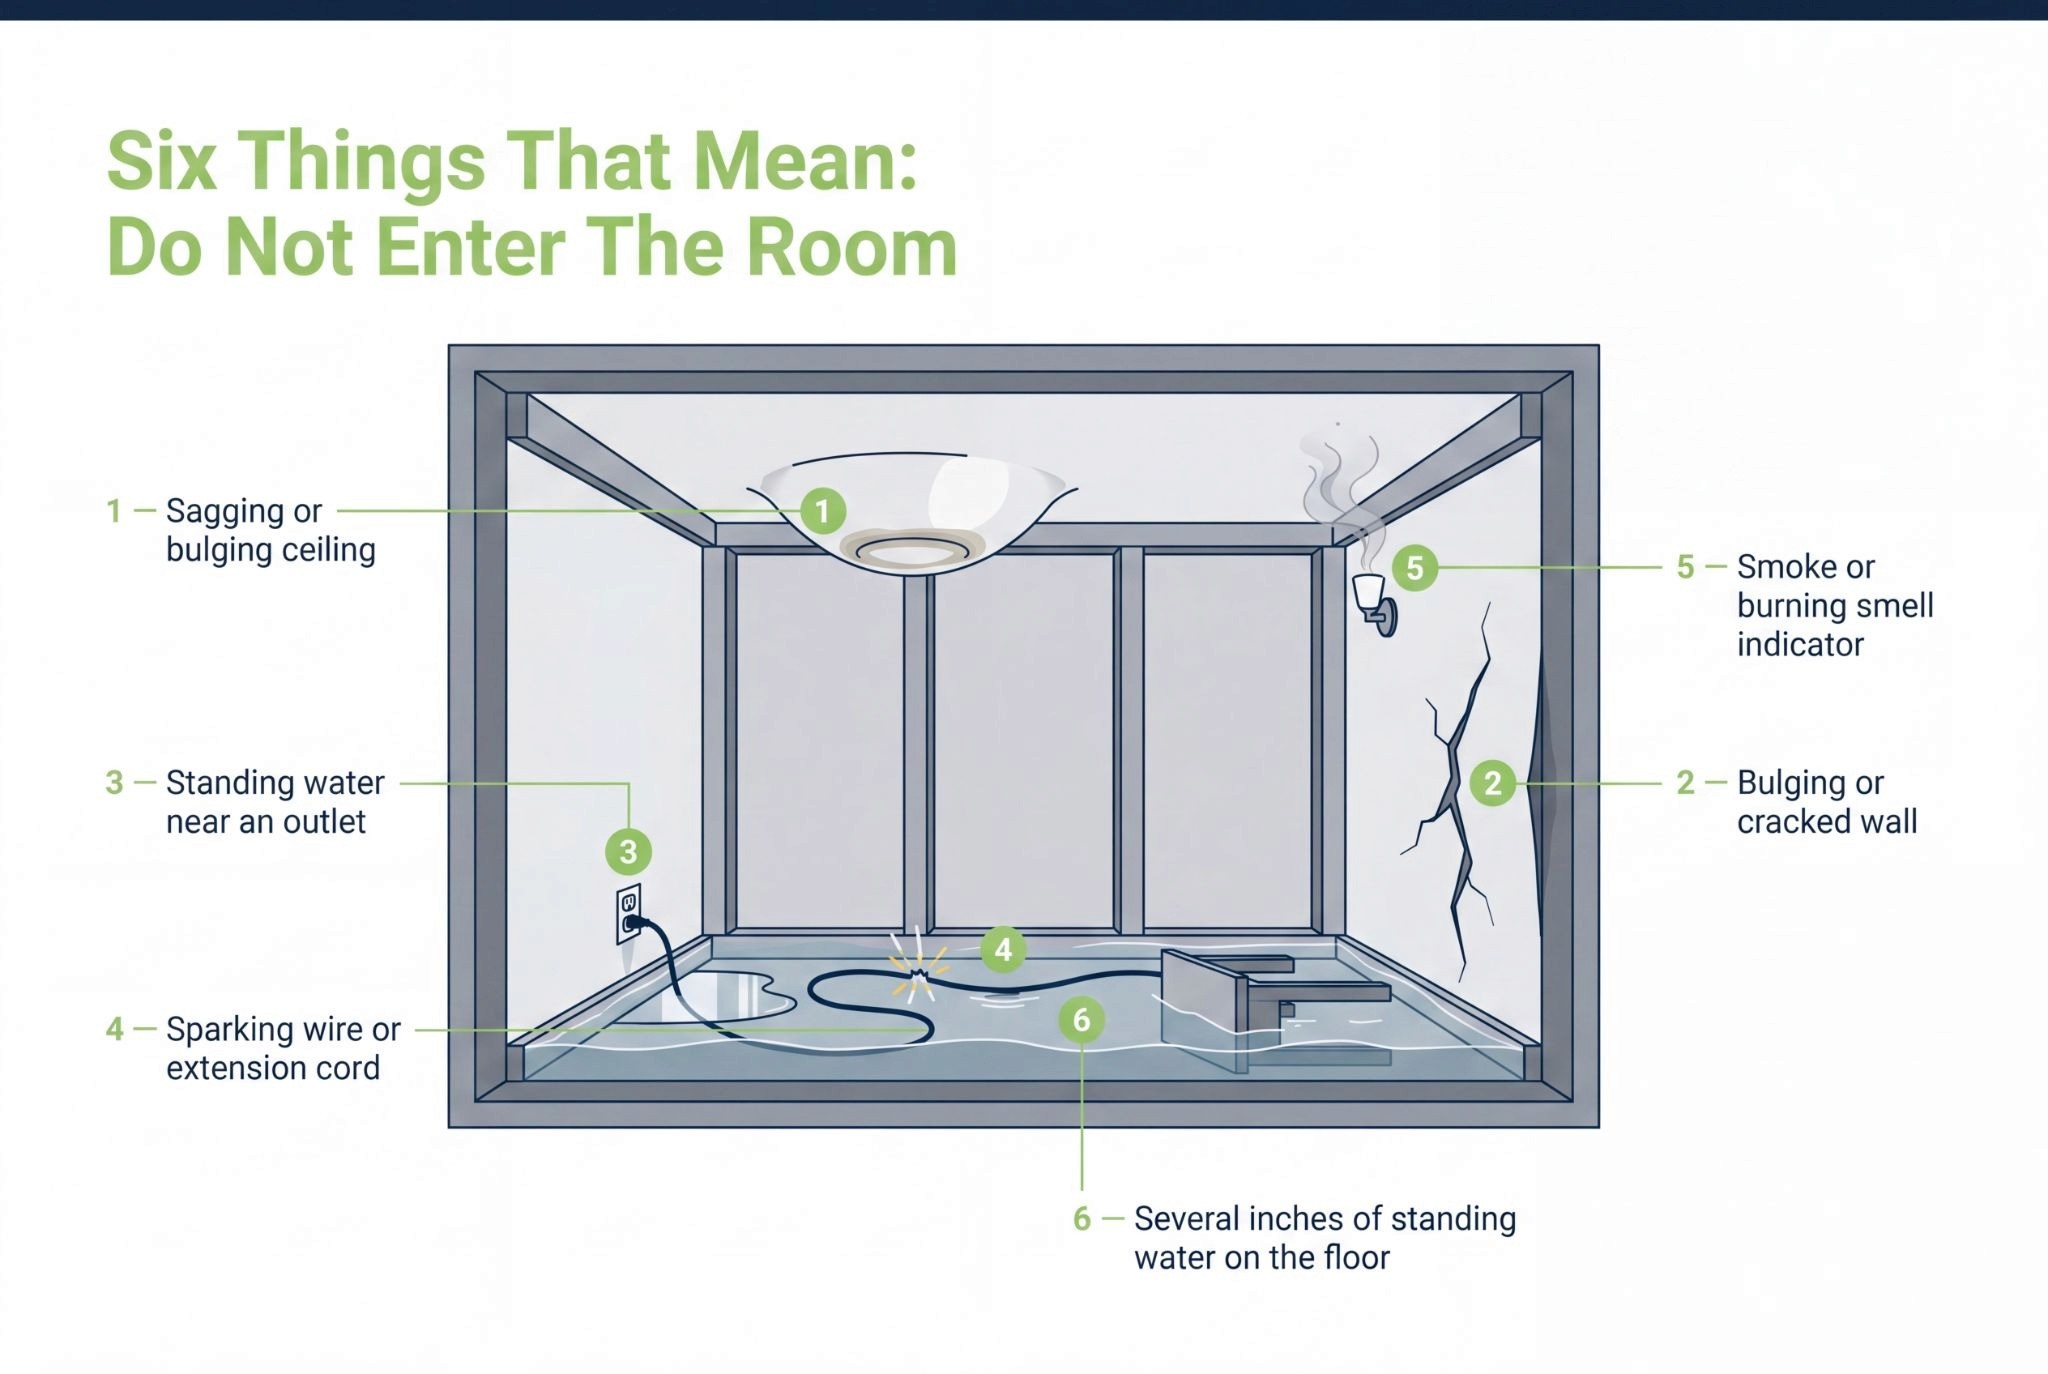
Evacuate Immediately If You See:
ceilings sagging or bulging
floors buckling
walls cracking
sewage
gas smells
repeated breaker trips
water still rising
These are emergency-services situations.
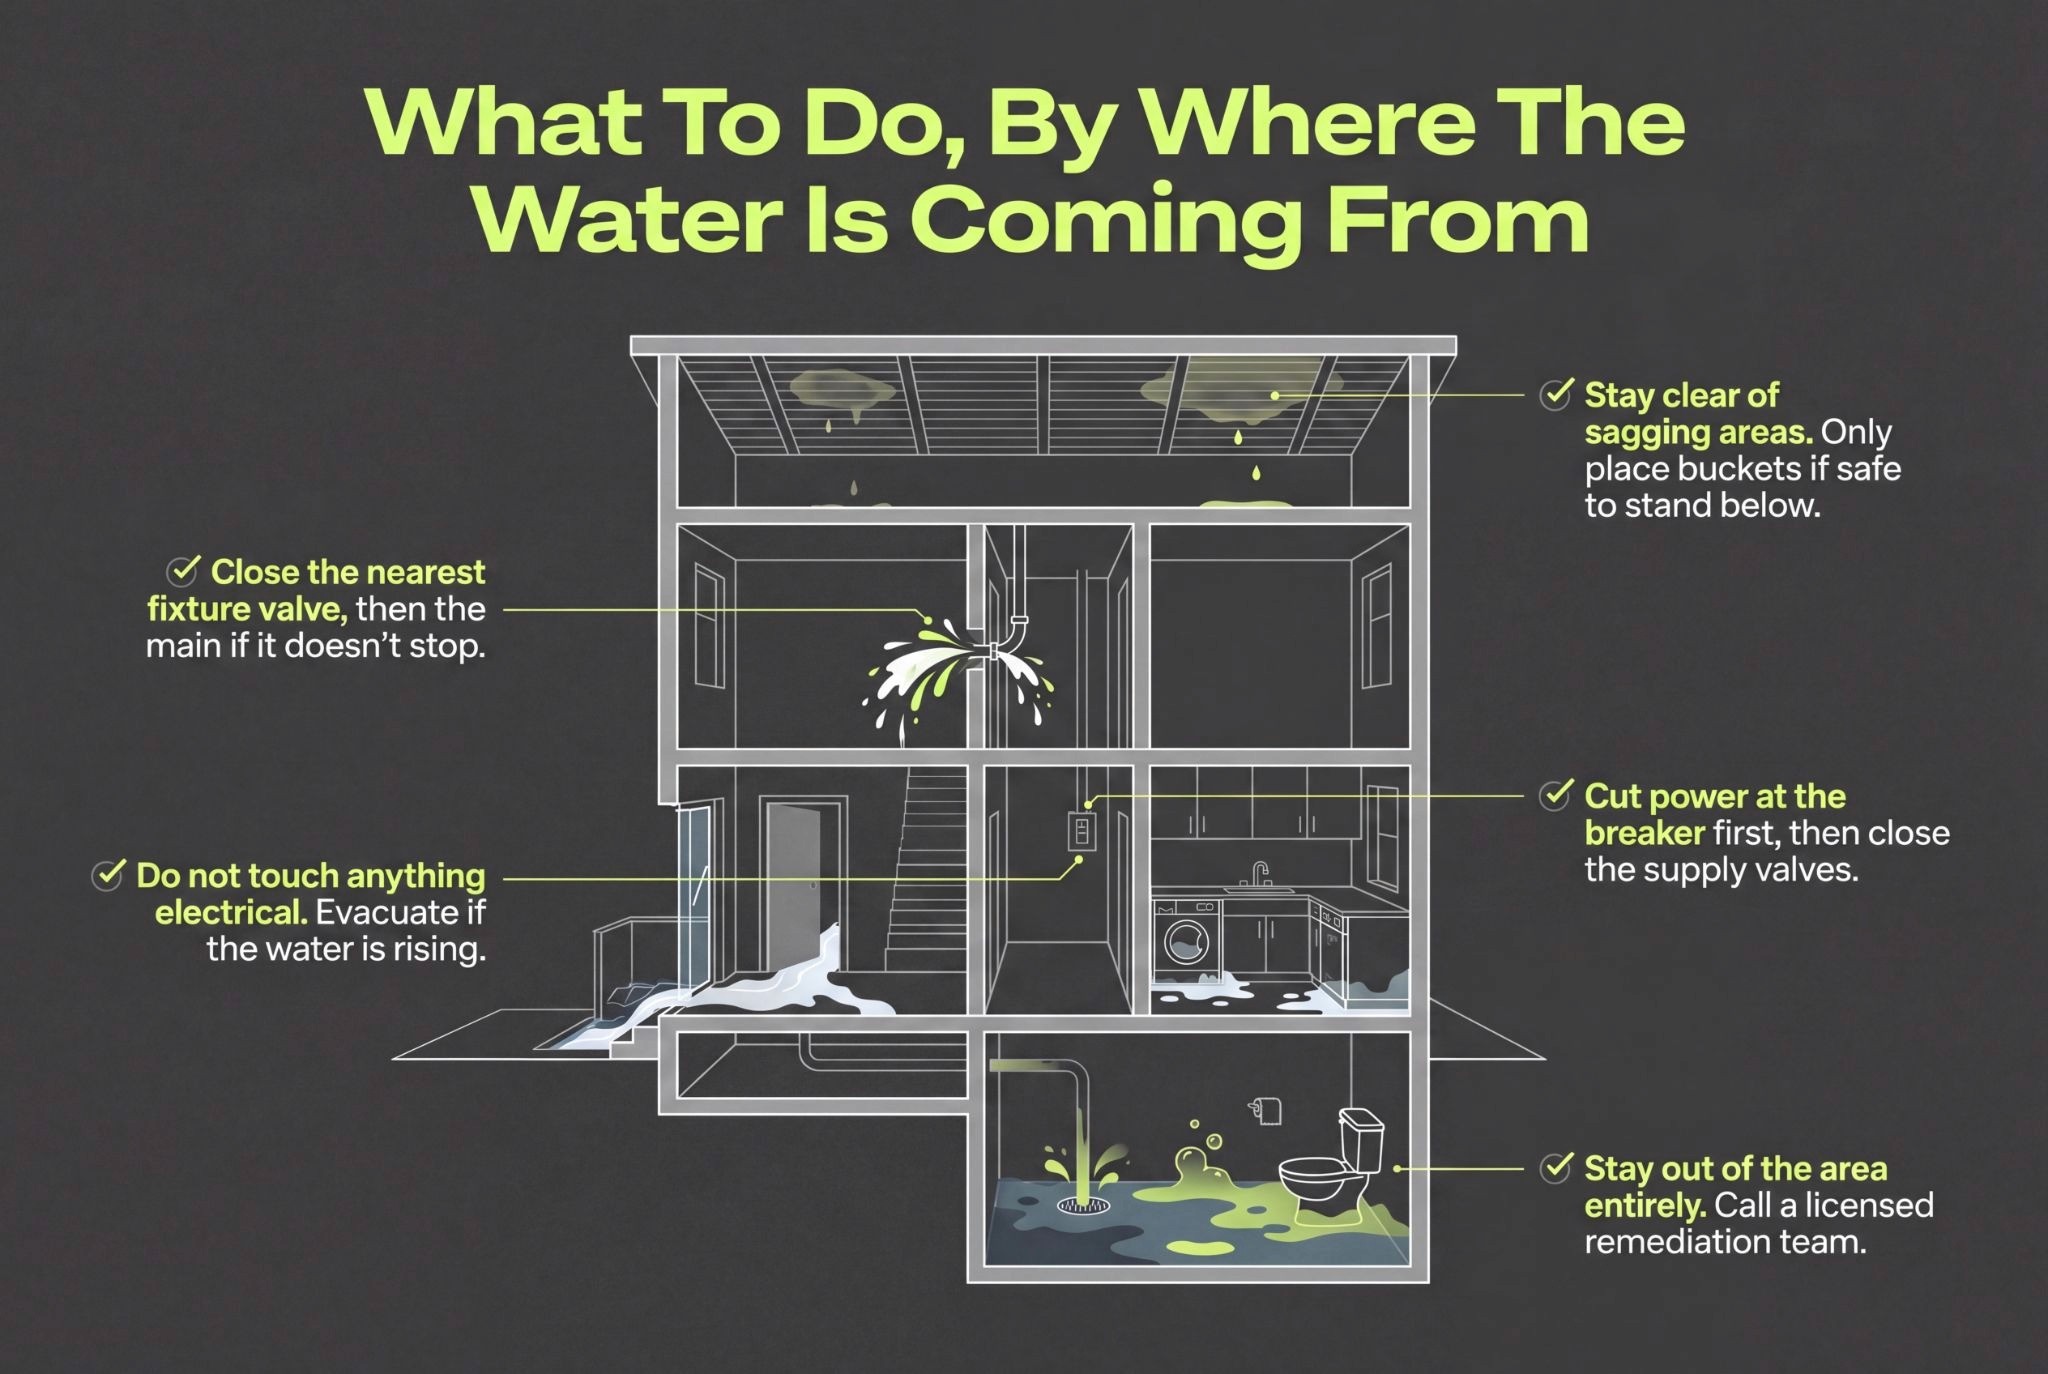
Step 2: Stop The Water At The Source
Once the area is safe, stop the flow.
Most water damage gets dramatically worse in the minutes you spend looking for the right valve, so move fast.
Start With The Closest Local Valve:
Under sinks
Behind toilets
On the back of dishwashers, washing machines, and water heaters
If the local valve won't fully close or you can't find the source, shut off the main water supply where the line enters the building.
One Exception Worth Knowing:
If the water is coming from outside the building (storm flooding, rising groundwater, a neighbor's leak into your unit) shutting off your main does nothing.
In commercial buildings, it can also disable fire sprinklers or critical equipment. In those cases, focus on safety, contain what you can, and call building management or emergency services.
Step 3: Document Everything Before You Move It
Before you start cleaning, hauling out furniture, or pulling up carpet, photograph and video every inch of the damage.
Insurance carriers want to see the scene as it was discovered, not after you tried to fix it.
What To Capture:
Wide shots of each affected room
Close-ups of the water source (cracked pipe, appliance hose, ceiling stain)
Water depth against a wall or piece of furniture for scale
Soaked materials and damaged contents
Date-stamp the photos if your phone allows
For Property Managers, Documentation Goes Further:
Time of discovery and who reported it
Who was notified internally and when
Arrival time of contractors and crews
All tenant communication
Receipts for emergency expenses – fans, hotel costs for displaced tenants, plumber call-outs
This paper trail is what gets a claim approved without a fight.
Step 4: Identify the Water Category (It Changes Everything)
The category of water dictates what can be saved, what has to be removed, what PPE crews need, and whether DIY cleanup is even legal under most insurance policies.
There are three:
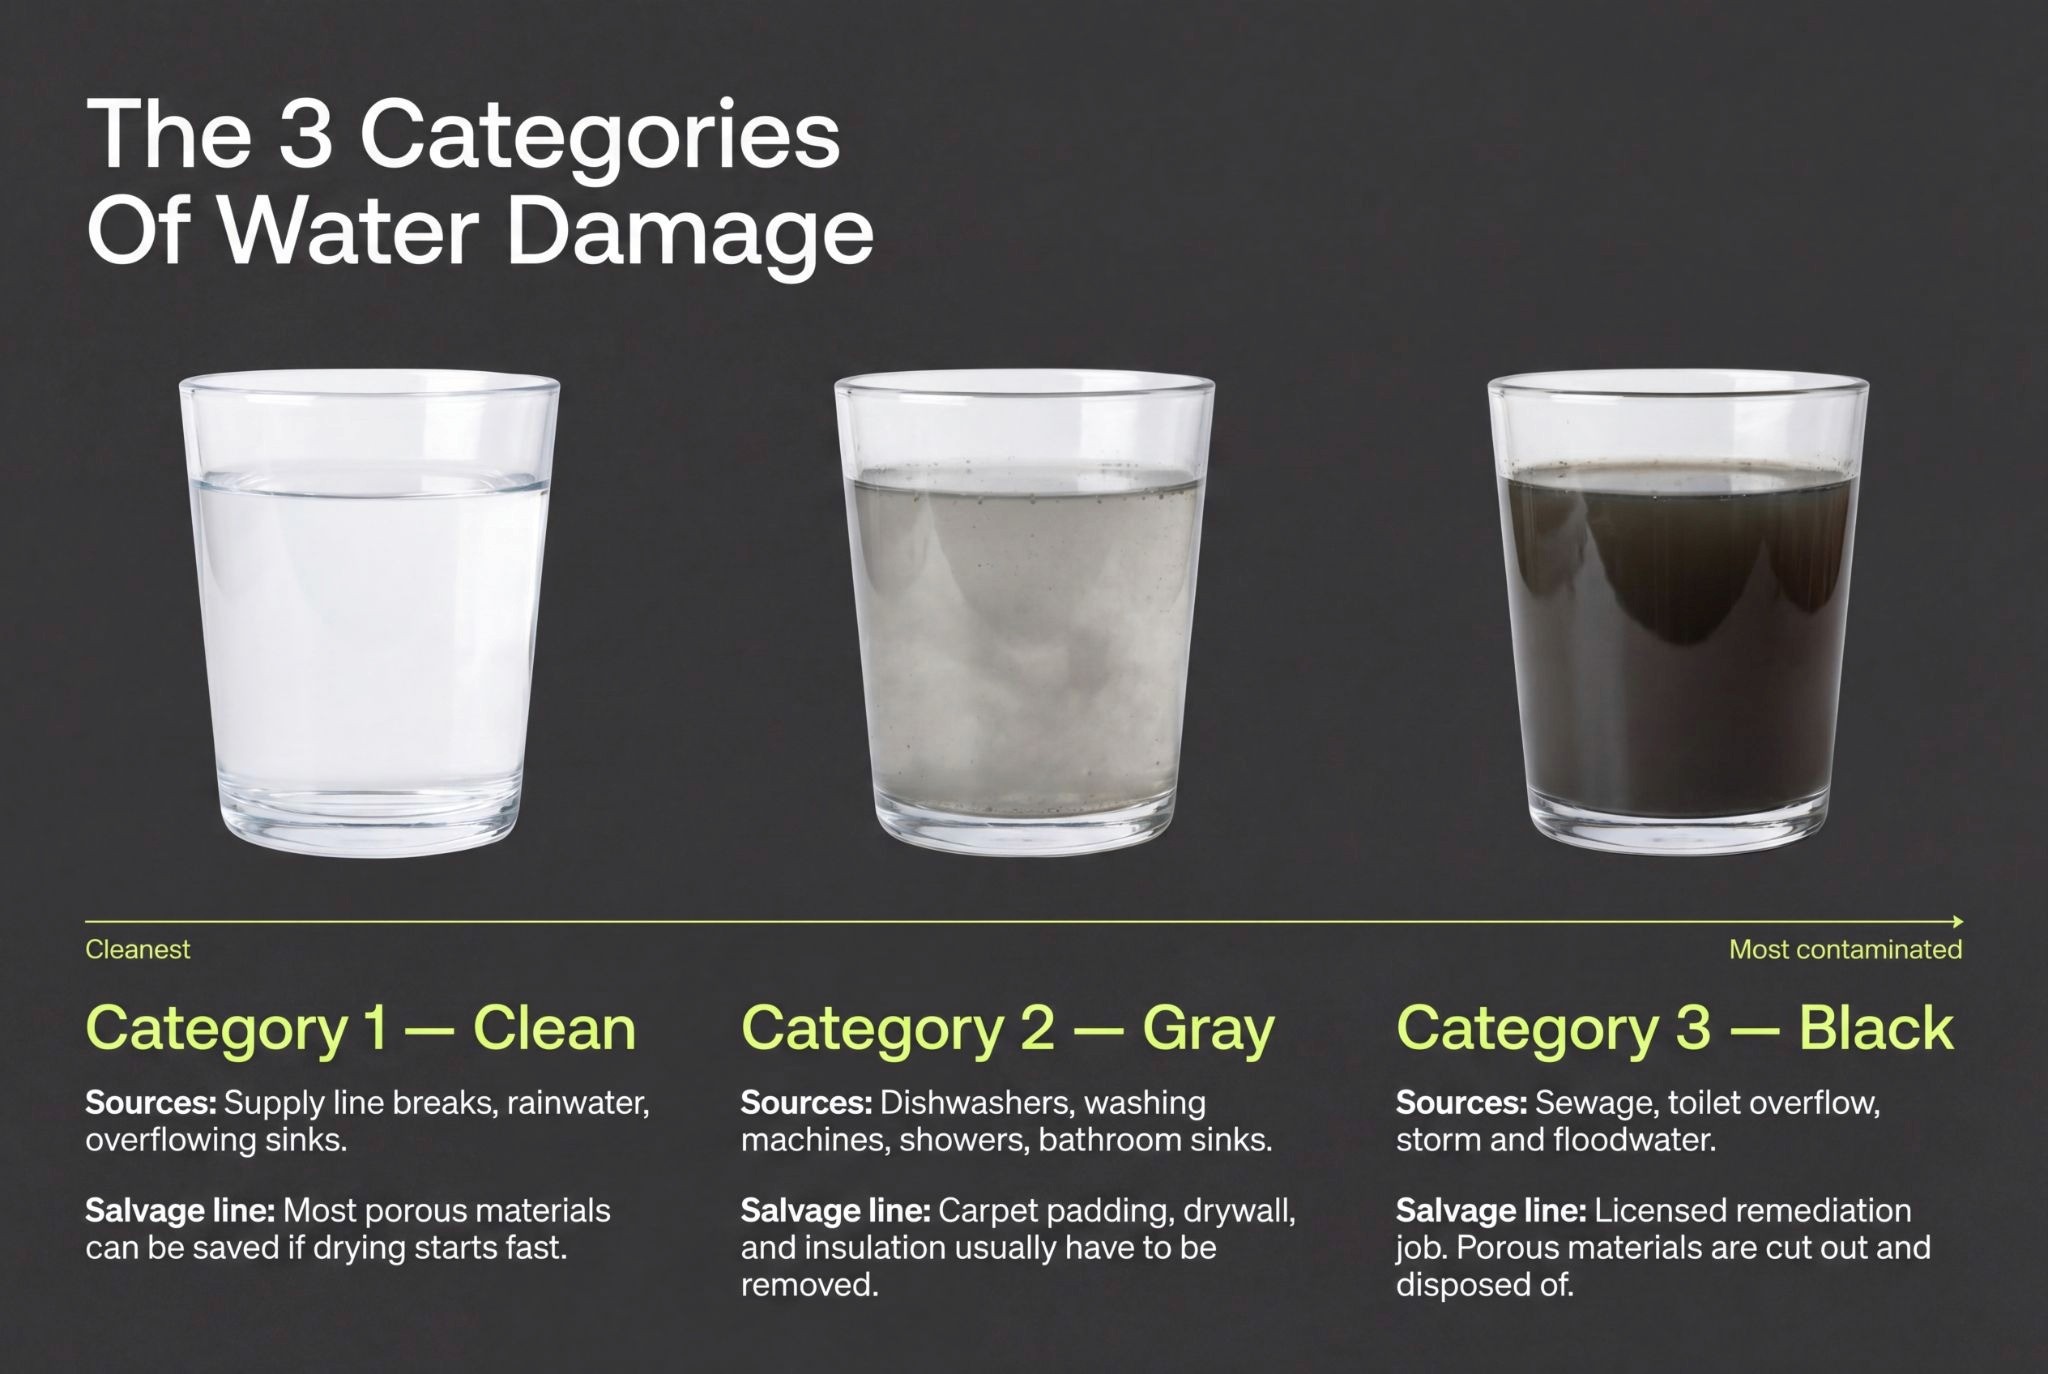
Here's The Part Most People Don't Know:
Even clean water turns gray within 24–48 hours as it sits and contacts building materials.
A burst pipe at 7 a.m. on Friday is a Category 1 job. The same leak discovered Monday morning is now Category 2 or worse. Speed is the entire game.
Step 5: Call Your Insurer & A Licensed Restoration Company
Who To Call First Depends On What's Happening:
Active spreading water or any safety risk →
Call a licensed restoration company first to stabilize the property, then your insurer. Most policies require the policyholder to take "reasonable steps" to prevent further damage. Calling for emergency mitigation is exactly that.
Stable, contained leak →
Call your insurer first, open a claim, get a claim number, then choose your contractor.
What To Ask Any Restoration Company Before You Sign Anything:
Are you licensed, insured, and bonded for water damage restoration in NYC?
Are your technicians IICRC-certified in WRT (Water Damage Restoration) and ASD (Applied Structural Drying)?
Will you provide a written, itemized scope separating mitigation from reconstruction?
Do you document drying with daily moisture logs and photos?
Do you bill the insurer directly?
Red Flags To Walk Away From:
verbal-only estimates
full payment demanded upfront
no mention of moisture readings
suggestions to "spray something and paint over it"
or pressure to sign before you've spoken with your insurer
A real restoration company sells documentation and dryness, not paint.
Step 6: Understand The Water Damage Restoration Process
Water mitigation and water damage restoration get used interchangeably, but they're different phases.
Mitigation is the emergency phase – stop, extract, dry, contain.
Water damage restoration is the full process: mitigation plus the cleaning, repairs, and reconstruction needed to bring the property back to its pre-loss condition.
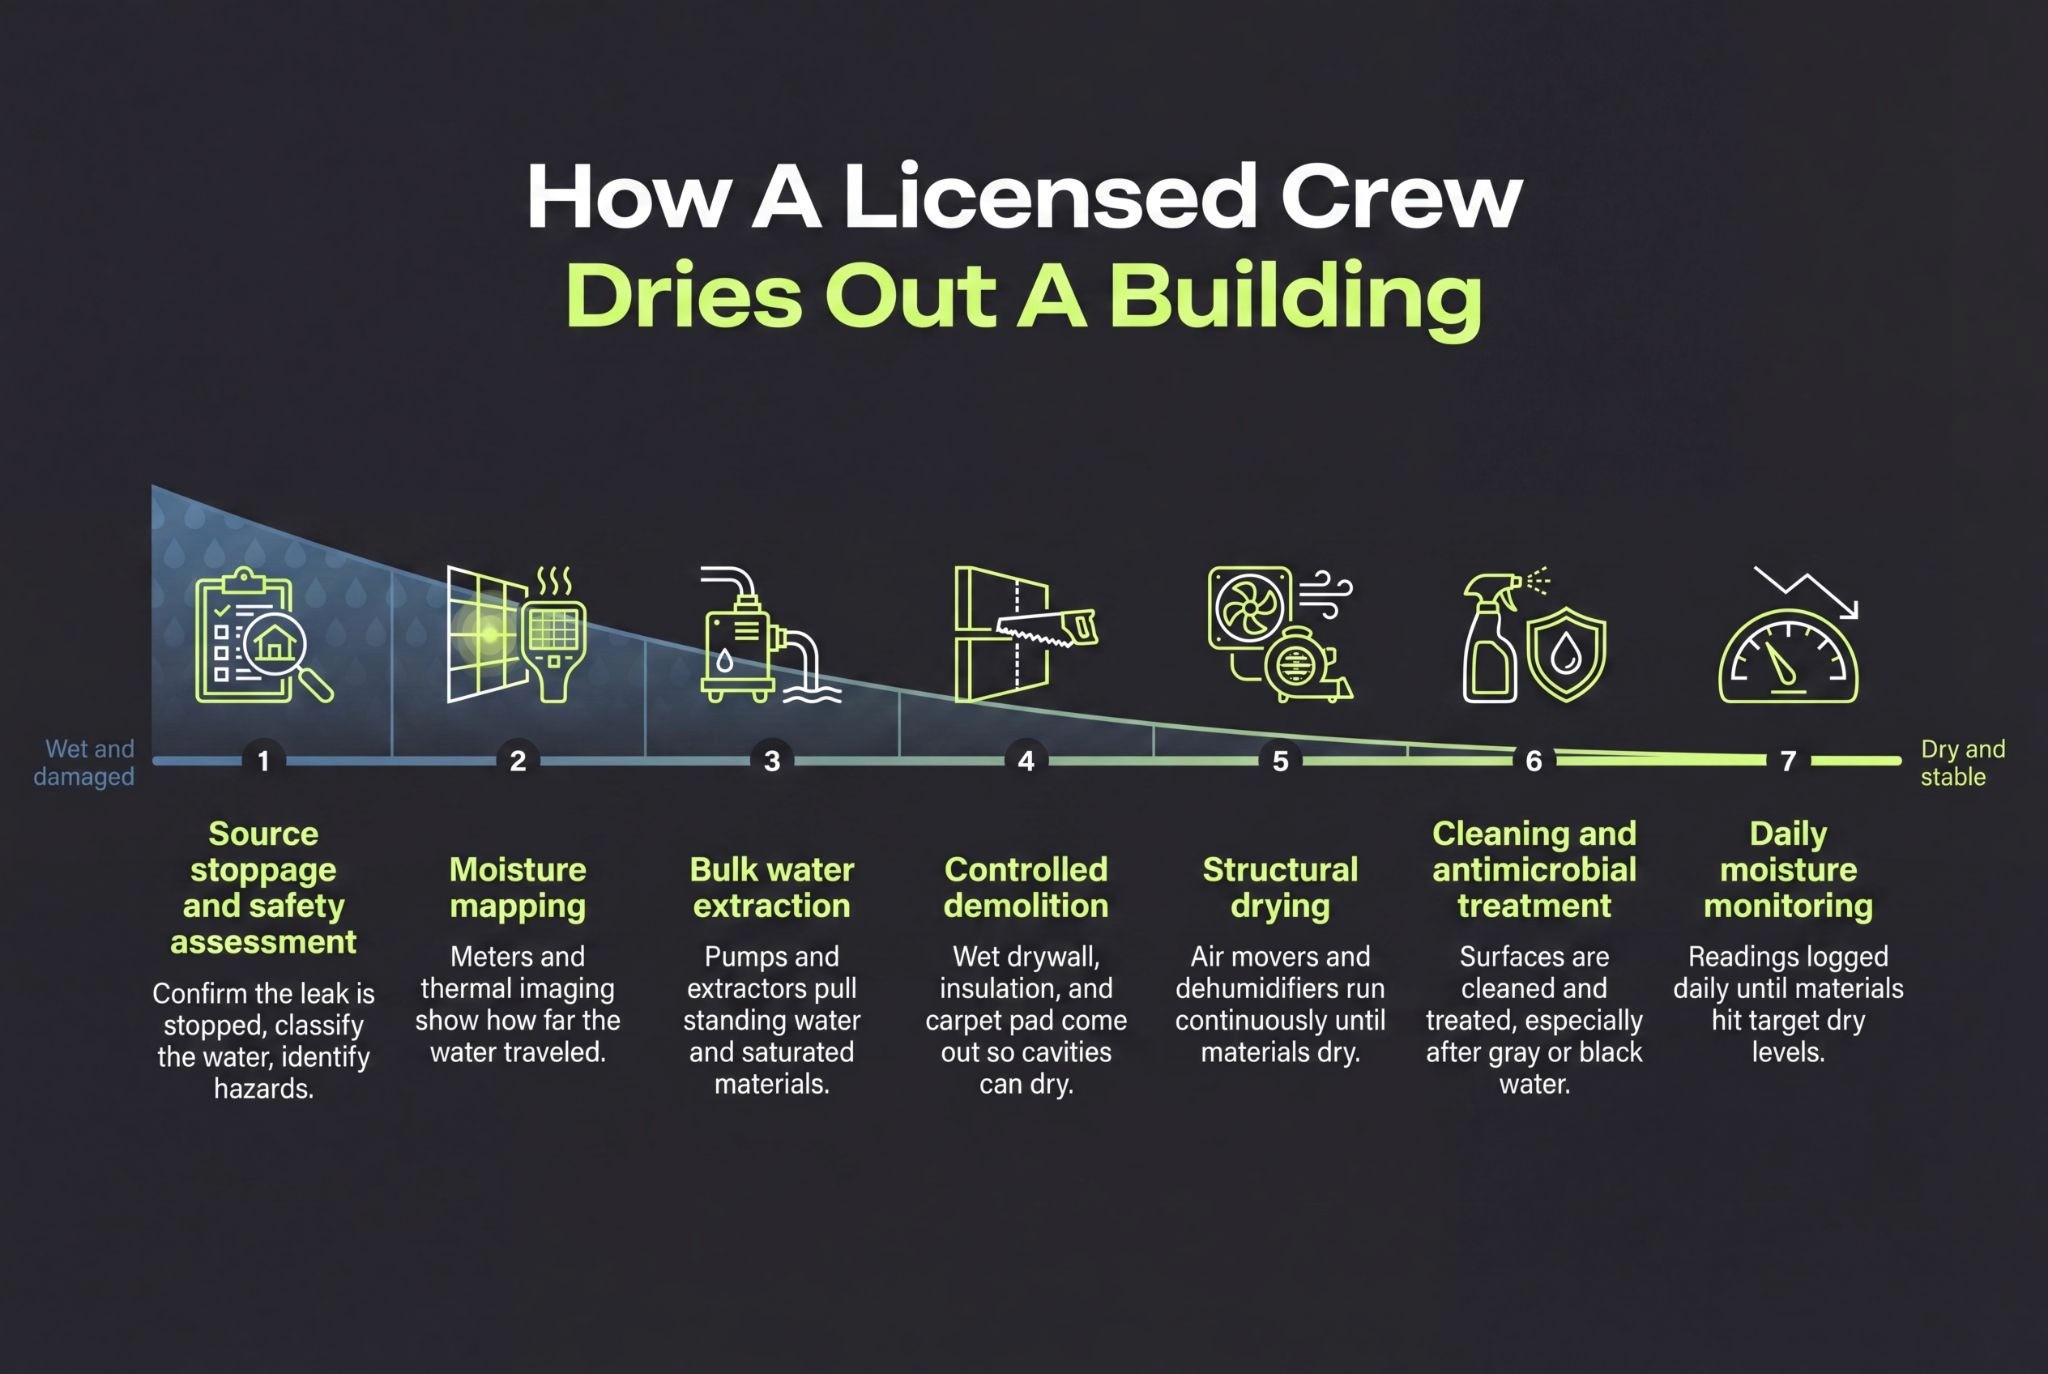
Drying out a house after water damage typically takes 3–5 days for a moderate clean-water event. Full restoration including reconstruction commonly runs from one week to several months depending on category, area, and material complexity.
Step 7: Know What Can Be Saved & What Has To Go
Material decisions come down to three factors:
water category
how long it stayed wet
how porous the material is
Generally Saved | Generally Replaced |
Hardwood with mild cupping (with specialty drying) | Carpet padding |
Lightly damp drywall edges | Swollen, soft, or crumbling drywall |
Surface-damp trim and baseboards | Wet insulation (fiberglass, cellulose) |
Tile, metal, sealed concrete | Laminate or low-grade engineered flooring |
Solid wood furniture (with drying) | MDF or particleboard cabinets |
Signs Water Damage Is Permanent:
floors that stay warped or buckled after drying
ceilings that sag or hold visible bulges
framing that's soft or crumbly when probed
stains that bleed through fresh paint
musty smells that return when humidity rises
Hidden Damage That DIY Cleanup Almost Always Misses:
moisture inside wall cavities
wet sill plates behind baseboards
swollen subfloors hiding under intact-looking flooring
mold growing behind built-ins or inside HVAC ducts that sat in the wet zone
Will A One-Time Water Leak Cause Mold?
Yes, it absolutely can.
Mold spores germinate in 24–48 hours when porous materials stay wet. Whether mold develops depends on how fast and how thoroughly the structure was dried, not whether the leak happened once or kept recurring.
Step 8: Verify The Job & Monitor For 30 Days
Don't let anyone close walls, floors, or ceilings until these boxes are checked:
Before Reconstruction Begins:
Source of the leak repaired and pressure-tested or rain-tested
Written drying report from the mitigation crew, with moisture readings
Repair scope approved in writing by the insurer
Before Cavities Are Closed:
All wet or moldy porous materials removed
Cavities visibly clean, dry, and free of staining
Moisture readings on framing match readings from unaffected parts of the building
Photos taken of open cavities before drywall goes back up
Final Walkthrough Water Damage Restoration Checklist:
No sagging, soft spots, cracks, or new staining anywhere
All outlets, switches, fixtures, and appliances in the affected zone tested and working
No musty, earthy, or sewage-type odors when doors are closed
Written documentation in hand: drying logs, photos, invoices, warranties
The 30-Day Vigilance Window:
Walk repaired areas weekly for at least four to six weeks.
Watch for:
fresh yellow-brown stains on ceilings or walls
bubbling or peeling paint
floors going spongy
baseboards pulling away
musty odors that show up when humidity rises (after rain, showers, laundry)
Any of these signals justify calling the restorer back for a re-evaluation.
What To Do After Water Damage FAQs
How much does water damage restoration cost in NYC?
Water damage restoration in NYC typically runs between $1,500 and $7,000 for moderate jobs, with severe events involving sewage, large square footage, or full reconstruction reaching $15,000 or more. Final cost depends on water category, area affected, and whether reconstruction is needed beyond mitigation.
Does homeowners or building insurance cover water damage?
Most policies cover sudden, accidental water damage – burst pipes, appliance failures, certain ceiling leaks. They generally exclude long-term seepage, gradual leaks, mold from unaddressed moisture, and external flooding (which requires separate flood insurance). Sewer backup coverage usually requires a specific endorsement.
How long does water damage restoration take?
Water damage restoration takes 3–5 days for the drying phase on a typical clean-water event, with full reconstruction running anywhere from one week to several months. Timeline depends on water category, materials affected, insurance approvals, and how much demolition and rebuild is needed.
Can you stay in the house during water damage restoration?
You can usually stay in the house during water damage restoration if the affected area is contained, the water was clean, and there's no contamination, mold, or structural risk. Sewage backups, large-area flooding, heavy demolition, and any work involving lead or asbestos typically require temporary relocation.
Dealing With Water Damage Right Now?
Get a licensed crew on-site fast – quote is free, no pressure.
Conclusion
What to do after water damage comes down to time and sequence.
The first hour decides safety, the first day decides salvage, and the first week decides whether you're paying for drying or for full reconstruction.
Get the area safe, kill the source, document before you clean, classify the water, and bring in a licensed crew who can prove the structure is dry with actual moisture readings. Skip any of those and the costs compound – quietly, behind walls and under floors, where you won't see them until the bill or the mold shows up.
We run 24/7 emergency water removal across NYC with HAZWOPER-trained crews, industrial extraction equipment, and insurance-ready documentation on every job. Get a free quote and have a licensed team ready before the next 24 hours start working against you.


